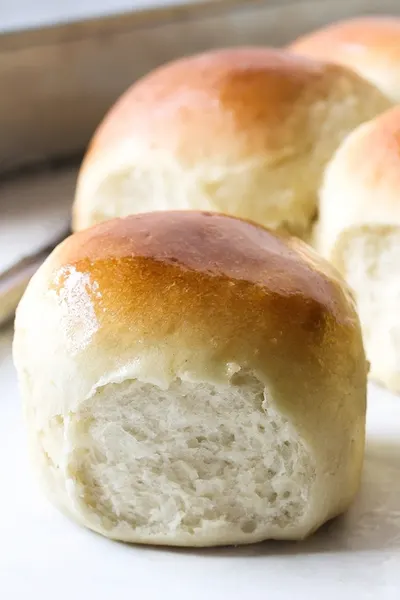
With the holidays just around the corner I thought it would be a great time to share my favorite dinner roll recipe that requires no kneading. It is a great way to get homemade rolls on the table without a lot of work or cost.
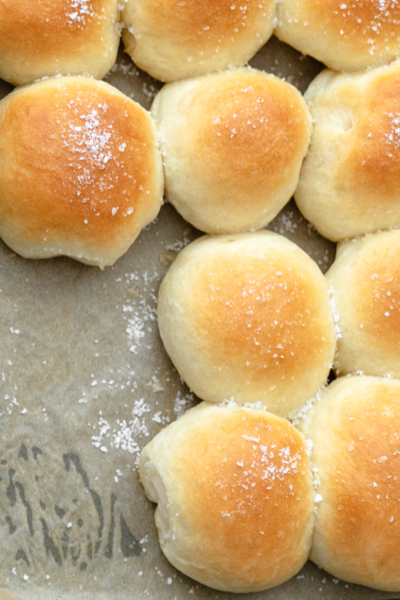
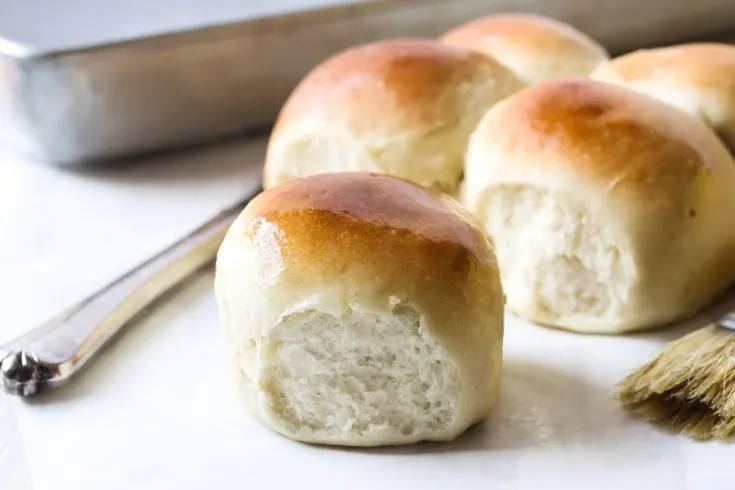
The rolls turn out light and fluffy on the inside and perfectly golden brown on the outside. Best of all there is little hands on time required to make them.
If you have ever made homemade rolls you know how time consuming that it can be. Not only do you have to wait several times for the dough to rise, but you also have to spend 10 minutes kneading the dough.

Of course, if you have a stand mixer and dough hook this work can easily be done for you. However purchasing one of those stand mixers can be expensive.
Therefore, I have developed a recipe that requires no kneading at all. And with no kneading, that means there is no special equipment required.
In fact, the only thing that you need are a few utensils, a bowl, measuring cups and spoons. And best of all you won’t be spending your time or effort kneading the dough.
Just mix the ingredients together and wait for the dough to rise. Then all you have to do is form the rolls and let them rise one more time before baking.
They are super easy to make and turn out perfect every time. However to make things even easier here are a few tips for making the homemade rolls.
Tips For Making Homemade Rolls
1. Use Bread Flour
Most dinner roll recipes include all purpose flour as the main ingredient. When you knead the dough it produces gluten which makes the rolls rise and become light and airy when baked.
However, because this is a no knead dinner roll recipe you must use bread flour in this recipe. This is because bread flour has a higher protein content than all purpose flour.
This extra protein helps with gluten development when compared to all-purpose flour. This will help make your homemade rolls to turn out just like they would if you kneaded the dough.

2. Water Temperature
In order for the yeast to activate, the water temperature needs to be between 105-115°F.
If you have too low of a temperature the yeast will actually leak and cause the dough to become too sticky. And if the water is too hot, the yeast itself will die and not activate at all.
Although some people use the back of their hand to determine if the water is at the correct temperature, I find it easier and more efficient to use an instant read digital thermometer.
3. Let the Dough Rise
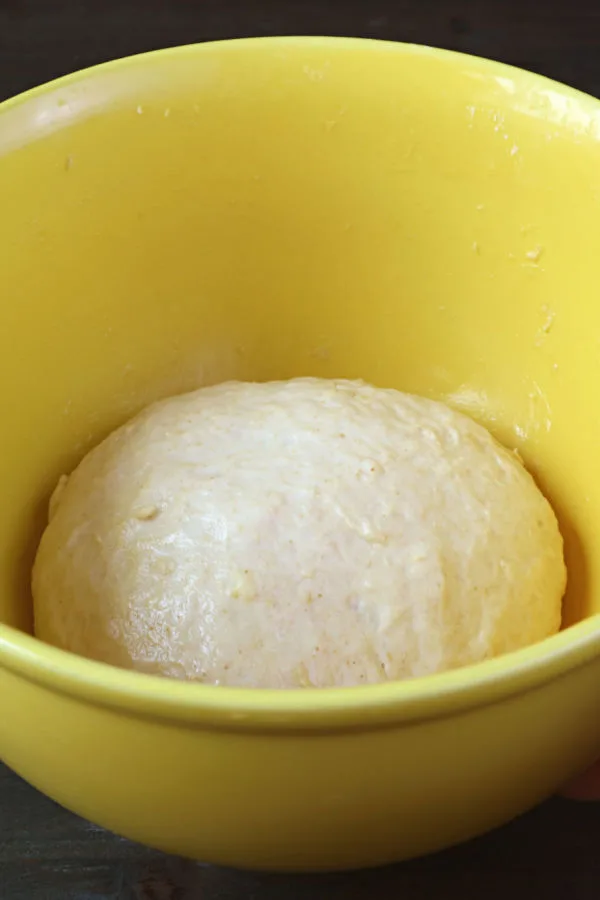
Once all the ingredients are mixed, you will be left with a sticky dough ball. This is okay!
Once the dough has time to rise, the stickiness will go away. And speaking of allowing the dough to rise, it is best to place the bowl in a warm, dry place.
Which could be difficult to find if you are making these No Knead Dinner Rolls in the middle of winter. However, there is another way that you can get the dough to rise in a warm environment.
Turn your oven on 200°F. Once it comes to temperature, turn off the oven and place the covered bowl with the dough on the rack.
The heat that remains in the oven will help your dough rise in about half of the normal time that it takes at room temperature.

4. How To Correctly Form Dinner Rolls
Before you can bake the rolls, the dough must be prepared and formed. Once the dough has tripled in size, you must first punch down the dough to release the gas that has formed inside the dough.
Then use your hands to shape the dough in a log. Use a serrated knife to cut the log into 4 equal pieces. Then cut each piece into thirds so that you end up with a total of 12 dough pieces.
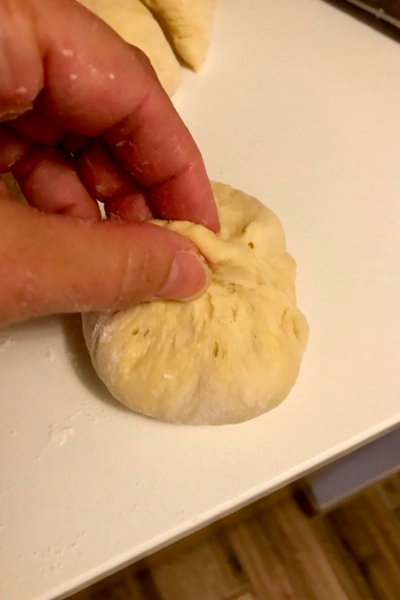
Next, working one at a time, flatten the center of the dough with the palm of your hand. Pull the sides upward and pinch the dough together in the center.
Finally, flip the dough over so that the seam sits on the surface of your baking sheet. Using this folding method will allow your dough to have a smooth top surface once baked.
However, before you place them in the oven, you must allow your no knead dinner rolls to rise one last time before baking.
But by following these simple tips you will have delicious dinner rolls on the table with very little work!
No Knead Dinner Roll Recipe
*Specific measurements and complete recipe instructions are located in a printable recipe card at the bottom of this article. However, be sure to continue to read the tips and tricks to making this recipe below.
INGREDIENTS
- 1 packet rapid dry yeast
- 1/4 cup granulated sugar, divided
- 1/2 cup warm water
- 4 ½ cups bread flour, plus more for dusting
- 1 1/2 tsp salt
- 1 cup milk
- 3.5 tbsp unsalted butter, melted and cooled
- 2 eggs, at room temperature, beaten with fork
Once The Rolls Are Baked
- 1 tbsp butter, melted

INSTRUCTIONS
Place the yeast and 2 teaspoons of the sugar in a medium bowl, then add the warm water. Let the mixture sit for 5 minutes until it begins to bubble.
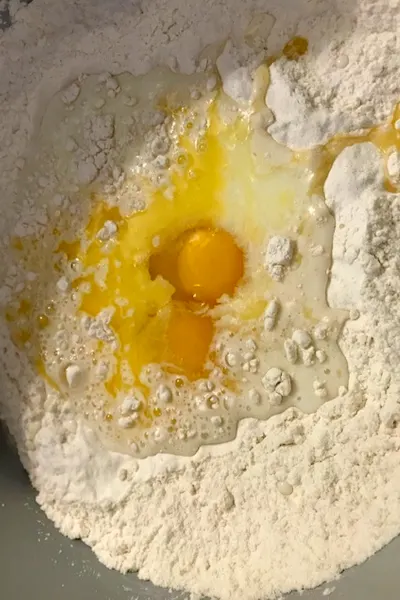
Place flour, remaining sugar and salt in a bowl. Whisk to combine.
Make a well in the center of the flour mixture. Add milk, butter, eggs and pour in the yeast liquid, including all froth in the well.
Mix until combined with a wooden spoon, the mixture will be thick and sticky.
Leave the dough in the bowl and cover with a towel and place in a warm place to rise for around 1 1/2 – 2 hours or until almost tripled in volume.
Line a 9 x 13 inch baking dish with parchment paper with the sides overhanging, set aside. Remove the towel and punch down the dough to deflate, then mix briefly in the bowl to get rid of the bubbles in the dough.
Dust a clean work surface with flour. Scrape the dough out of the bowl onto the work surface. Dust top of dough then form it into a log shape.
Cut the dough into 4 pieces and then cut each piece into 3 pieces so you have 12 rolls in total.

Form The Rolls
Take one piece and press down with the palm of your hand. Then use your fingers to pinch the sides until it forms a ball.
Flip the dough so the smooth side is up, then roll the dough briefly to form a ball. Place the ball with the smooth side up in the baking dish.
Repeat with remaining dough. Line the no knead dinner rolls in rows of 3 x 4.
Spray the surface of rolls with olive oil spray and then place plastic wrap over the tray. Return tray to warm place and leave for 30 – 45 min, until the dough has risen just a little less than double in size.
Preheat oven to 390°F (198°C). Bake for 15 – 18 minutes, or until the top surface is a golden brown in color.
Remove the rolls from oven and then brush the tops with the melted butter. Use the overhanging parchment paper to lift the rolls onto a cooling rack.
Allow to cool slightly before serving.
We like to serve these No Knead Dinner Rolls at all of our holiday meals. But also we love to make them to help us soak up the broth in our favorite soups, including our Slow Cooker Ham and Bean Soup.
Enjoy! Mary


To receive our 3 Recipe Articles in your inbox each week, sign up for our free email list located in the middle of each recipe or email me at contact@makeyourmeals.com. You can also follow us on Facebook and Pinterest. This article may contain affiliate links where a small commission is paid if you purchase a product at no additional cost to you.
No Knead Dinner Rolls

How to make dinner rolls without a dough hook and without kneading. Light and airy dinner rolls that are perfect for any occasion.
Ingredients
- 1 packet rapid dry yeast
- 1/4 cup granulated sugar, divided
- 1/2 cup warm water
- 4 ½ cups bread flour, plus more for dusting
- 1 1/2 tsp salt
- 1 cup milk
- 3.5 tbsp unsalted butter, melted and cooled
- 2 eggs, at room temperature, beaten with fork
For Brushing:
- 1 tbsp butter, melted
Instructions
- Place the yeast and 2 teaspoons of the sugar in a medium bowl, then add the warm water. Let sit for 5 minutes until it begins to bubble.
- Place flour, remaining sugar and salt in a bowl. Whisk to combine.
- Make a well in the center of the flour mixture. Add milk, butter, eggs and pour in the yeast liquid, including all froth in the well.
- Mix until combined with a wooden spoon, the mixture will be thick and sticky.
- Leave dough in the bowl, cover with a towel and place in a warm place to rise for around 1 1/2 - 2 hours or until almost tripled in volume.
- Line a 9 x 13" baking dish with parchment paper with the sides overhanging, set aside.
- Remove tea towel and punch dough to deflate, then mix briefly in the bowl to get rid of the bubbles in the dough.
- Dust a clean work surface with flour. Scrape the dough out of the bowl onto the work surface. Dust top of dough then form into a log shape. Cut the dough into 4 pieces and then cut each piece into 3 pieces so you have 12 rolls in total.
- Take one piece and press down with palm, then use your fingers to gather into a ball, flip (so smooth side is up) then roll the dough briefly to form a ball.
- Place the ball with the smooth side up on the tray. Repeat with remaining dough. Line them in rows of 3 x 4.
- Spray surface of rolls with olive oil spray and then place plastic wrap over the tray.
- Return tray to warm place and leave for 30 - 45 min, until the dough has risen just a little less than doubled in size.
- Preheat oven to 390°F (198°C).
- Bake for 15 - 18 minutes, or until the surface is a golden brown.
- Remove the rolls from oven. Brush the tops with melted butter.
- Use the parchment paper to lift the rolls onto a cooling rack. Allow to cool slightly before serving.
Notes
Recipe provided by Make Your Meals
Nutrition Information:
Yield:
12Amount Per Serving: Calories: 264Total Fat: 6gSaturated Fat: 3gTrans Fat: 0gUnsaturated Fat: 2gCholesterol: 44mgSodium: 322mgCarbohydrates: 43gFiber: 1gSugar: 5gProtein: 8g
Nutritional Information is to be used as a general guideline only . Nutritional calculations will vary from the types and brands of the products used.